Showing posts with label craft. Show all posts

Friday, October 19, 2012

Toy Box Makeover Part 2

If you missed the beginning of this makeover, you can read about the first day of it here

After letting the stain dry for a full 24 hours, I got out my trusty overhead projector. I used it to trace the design I wanted onto the toybox. After tracing with pencil, I filled in the design with about 400 coats of white acrylic craft paint.

After painting the millions of coats of paint, I finally got the design looking the way I wanted. It was then time to seal the entire piece. I normally use polyurethane, but because I didn't want the yellowing to happen over the crisp white paint, this time I used Minwax Polycrylic. Yes, it's expensive, but I love the fact that it's a water cleanup and doesn't yellow. Then I just had to let it dry.
There is the final product. The stain deepened to that rich blue color I wanted, without losing the woodgrain. To me, this now looks like a toy box. It's happy and cheerful and just asking for toys to be put into it.

A before and after so you can see the transformation.

Disclaimer
* I was in no way compensated for this post. I use Mixwax products because I love them and they are easy to use.*

Wednesday, October 17, 2012

Toy box makeover Part 1

Months ago, I bought an old solid wood toy box for Alvin. It was a steal for $15 at the flea market. Since then, we've been using it in the living room to store all his wooden trains and tracks for his train table. It's functional, but it's not exactly what I'd choose for a toy box. (I think they should be colorful. They are storing toys after all.) So, today, I drug out the orbital sander and got to work.

 Here is the toy box before I began the make over. You can see it's just a typical brown stained wooden toy box. Clearly no fun at all. That's all about to change.

Tuesday, October 2, 2012

Turtle Baby Quilt

A week or so ago, I made a baby quilt for a dear friend of mine. My Grandma wasn't able to see it before I mailed it off. So, here it is Grandma! It's a crib-size quilt. The backing is a fleece-type alphabet fabric.

 Closeups of the two turtle fabrics. My friend dearly loves sea turtles, so I had to put them in this quilt.

So, there you go Grandma! This is the quilt I made.

Sunday, September 23, 2012

Steelers tutu how-to

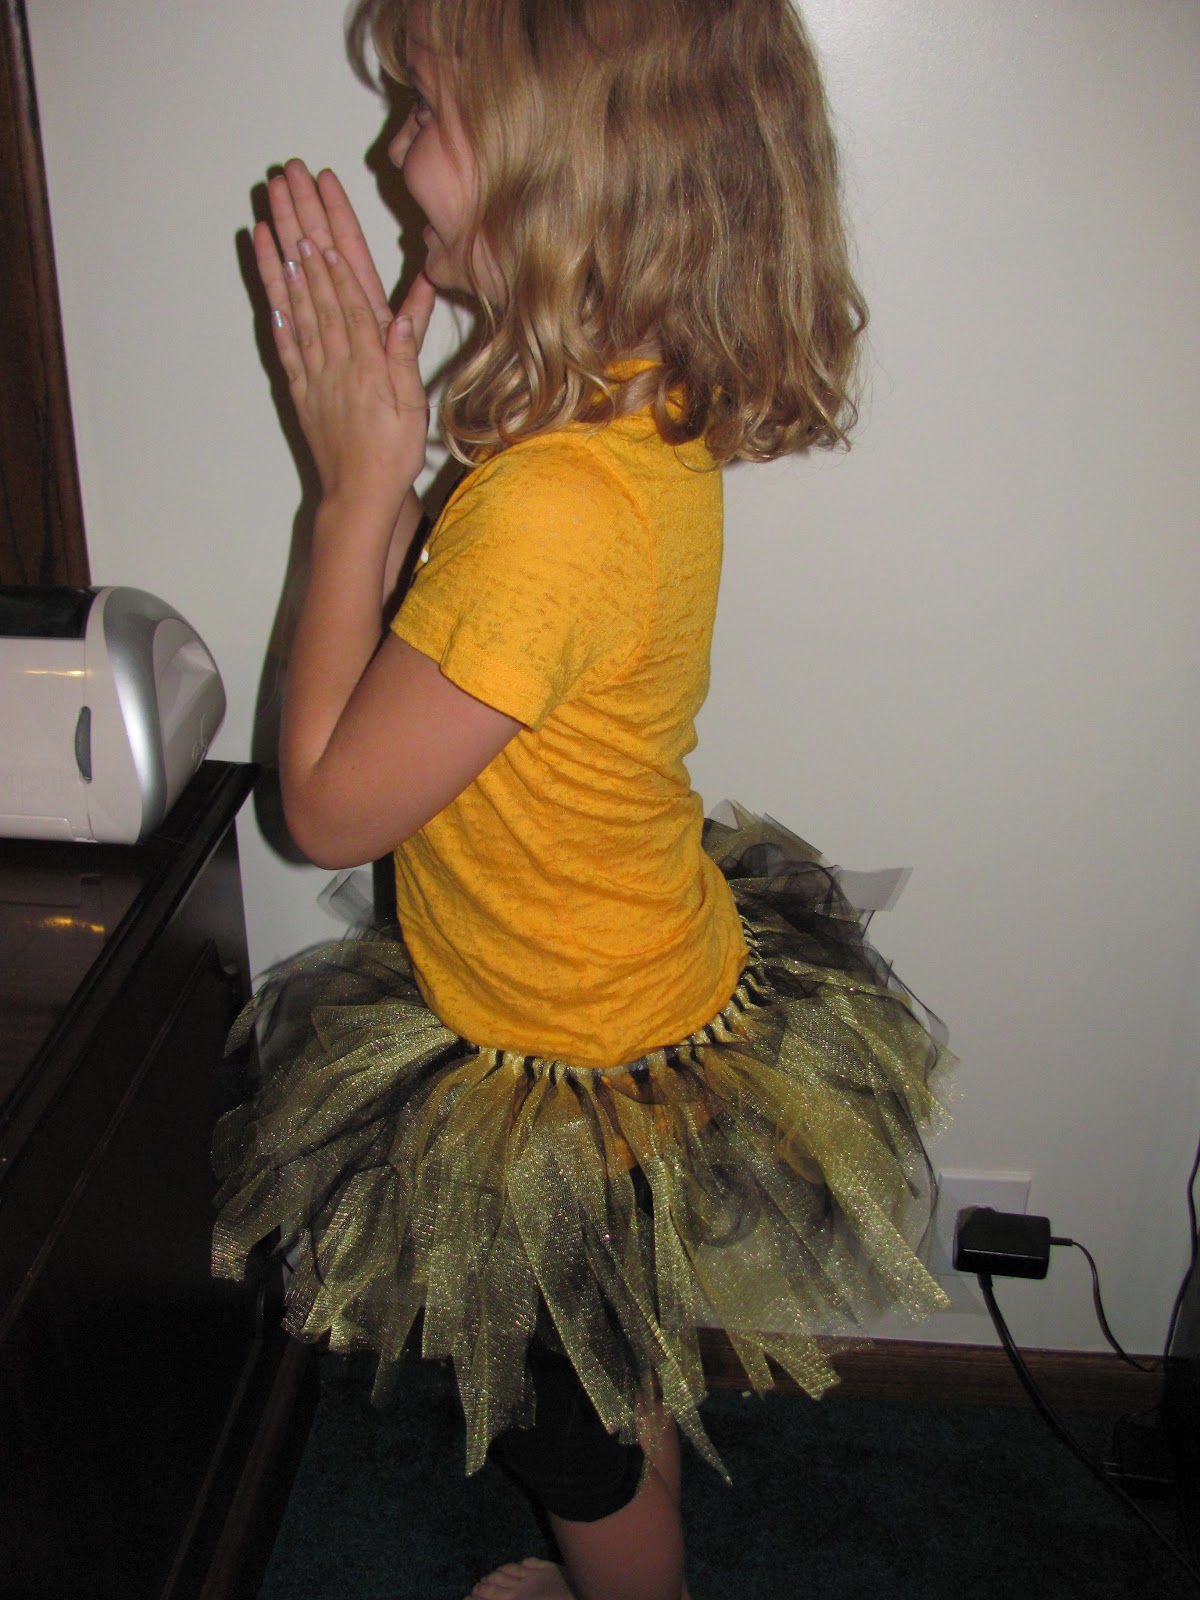
This upcoming week is Spirit Week at the kids' school. Monday is Cowboy/Cowgirl day. Tuesday is Pajama Day. Wednesday is Superhero day. Thursday is Favorite Sports Team day. Friday is EXTREME Blue & White day. So, for Thursday Erin really wants to wear Steelers stuff. Well, she has a Steelers shirt that she loves, but she wanted to show even MORE spirit. Enter Mom. I decided to make her a black/yellow tutu to wear with her Steelers shirt. She LOVES it!

Steelers tutu how-to

Materials needed:

1 yard yellow tulle
1 yard black tulle
1 package 1/4 inch elastic
1 pair of scissors

Directions:


Cut both yards of tulle into 1x12" strips. What I did was fold the tulle in half, then cut my one inch strips. Then I simply cut those in half to get the 12" length.

Take your elastic and cut to length using the child's waist as a guide. Overlap by one inch and hand sew or machine sew together.

Using a chair back to hold the elastic, tie alternating strips of tulle onto the elastic. It's a mindless time-consuming task. I was watching the Raiders-Steelers game while I did it. Just keep tying until you're all the way around the elastic.

 Remove from chair and let your child prance all around living room.

She just loves the tutu. I'm so glad I did this for her. It was very simple to do, and rather low cost. The yellow sparkle tulle was the highest cost at $4/yd. The black tulle was $2/yd. So, for under $10 total, she has more Steelers spirit.


Sunday, September 9, 2012

Are you ready for some football?

I am! Tonight is the first regular season Sunday Night football game. The Steelers and the Broncos are playing, so you know that if Eric wasn't on afternoons, there'd be some yelling going on in this house. (I'm a diehard Steelers fan. He's a Broncos fan.)

Well, yesterday, I got a bur up my behind that I wanted to make a rag wreath. What better way to combine two things I love than making a Steelers rag wreath!

I just love the way it turned out.

Saturday, January 28, 2012

Valentine's Day Wreath Tutorial

Items needed:

Styrofoam wreath form
4-5 feather boas
floral wire
ribbon (or a premade bow)
wooden saying (prepainted or you can paint yourself)
glue gun and glue

Directions:

Wrap boas, one at a time, around wreath form, like you're wrapping it. Glue every inch. This will take 4-5 boas if you use the 14" wreath form like I did.
After wrapping boas, use a piece of floral wire to wrap around the wreath to make a hook to hang from. Attach wooden saying and bow, both with floral wire. Hang and enjoy! Easy!

Monday, December 12, 2011

Joy of Christmas

Friday night we went to the local festival of lights called "Joy of Christmas". It was the first year for it, so the light displays were a little lacking. They had tons of activities for the children though.


Thursday, December 8, 2011

New Christmas Tree Skirt

So, I've become addicted to this online pinboard called Pinterest. On there, there is a pin of a no-sew tree skirt. I just knew I had to do this, as our current tree skirt is obscenely cheap looking. (It was cheap, but still.) So, I grabbed my glue gun, some glue sticks and some fabric and got down to business. Here is the final product!


Thursday, September 22, 2011

Halloween Wreaths

Yep, I know I'm a tad bit early, but ya'll I am ready for the holiday season to get started. So, tonight while watching TV, I made TWO, yes 2! different wreaths for Halloween! Sorry, no how-tos as I got so into what I was doing I didnt take pics of the different steps. Sorry. :(


Black Feather Monogram Wreath

Close up of the ribbon and monogram


 Black Glitter Garland Wreath w/ Pumpkin Confetti
 Closeup of the Pumpkin Confetti
While I like both of these wreaths, I absolutely LOVE the feather wreath. I think it may be my favorite craft yet!

Saturday, January 29, 2011

Emali's Desk Re-do

So, Emali's been wanting a desk do to her homework on for a while. We finally found one we liked at Goodwill. We sanded it, primed it, and painted it. Emali picked out an eletric blue and plum purple. I made it have a chalkboard top. She LOVES her desk. And for < $40, I do too.

 After sanding. Sorry I dont have pics before sanding.
The finished (sort of) desk. We still need to find drawer pulls she likes, but I like how it turned out. (Please forgive the crap on her floor. She refuses to vaccum and I'm sick of arguing about it.)

Saturday, January 1, 2011

Valentine's Day wreath

Yes, I know I'm early on making things for Valentine's Day. However, there isnt a 'decorating' holiday between now and then. I dont really even like Valentine's Day, but the girls enjoy it. So, we do decorate some for it. Today was a silk organza wreath. It was time consuming but turned out well.


Photobucket

Tuesday, December 28, 2010

Curtains, children and a closet.

Yeah, stupid title, but that's what this post is about. Today was a domestic day for me. Eric and I converted a coat closet into a pantry. Going from a kitchen with over 30 cupboards to one with 15 leaves a lot to be desired. Especially when the old kitchen had a HUGE pantry. It was a converted laundry closet, so you can imagine the size of it. So, we converted the closet so that we'd have storage space for food, since my Fiestaware fills every cupboard in the kitchen. Please, dont judge what's IN our pantry. Not everyone is a health nut and I love to bake. :)


So if you look to the top of the picture, you can see the original metal shelf that was the coat closet part. We added the black shelves. It was fairly simple. We got some 5/8 inch plywood, some 2x3's for bracing and some faux leather Contact Paper to cover the shelves with. Now we have a LOT of storage space for food.

The second project I did today was convert a fabric shower curtain into regular curtains for the living room. Our living room window is oddly sized and I couldnt find curtains to fit. Not only that, I didnt find any I liked enough to hem. So we bought a fabric shower curtain in a pattern we liked and I made the curtains from that. What do you think?


I think they turned out pretty well, but I'm biased cause I made them. The final thing I'm gonna leave you with are pics of the girls (and Eric) playing in the snow.


Friday, November 26, 2010

I believe in joy

I've been in the crafty state of mind lately. So, I made some holidy banners to hang around my house. I  am only going to post a picture of one that I have done, but I have done four in total. Joy, Believe, Be Merry and Noel. I make them out of heavy-weight cardstock, seasonal scrapbook paper, and ribbon. They are labor intensive, but turn out wonderful. Are any of you doing any crafting for the holidays?


Photobucket

Tuesday, October 12, 2010

Halloween Wreaths

Here are the Halloween wreaths the kids and I made last night. All it took was some wooden wreath forms, ribbon, candy corn/pumpkins, some paint and hot glue. Took us an hour to assemble, then took 12 hours for the sealant to dry. Quite a fun project for the girls to do.

Emali's wreath
My wreath

Erin's wreath

Alvin's wreath


Photobucket